


Guide: merchOne AI Product Configurator Takes Your POD to a New Level!
Ever struggled to find designs that are both trendy and uniquely yours? What if creating eye-catching merch was as easy as tapping into your imagination – no design skills required? It might sound too good to be true, but merchOne’s AI Product Configurator makes it your reality. Forget about feeling intimidated by complex software or endlessly searching for the perfect image, all you need is now at your fingertips.
Let AI do the heavy lifting, then tweak the results into something truly yours. Create merch that stands out, speaks to your audience, and leaves those bland competitors behind. It’s time to ditch frustration and embrace the thrill of bringing your ideas to life with the power of AI and effortless editing tools.

Think of it as the ultimate creative shortcut with a power to significantly increase your profit potential. Our AI Product Configurator gives you the building blocks for amazing designs, freeing you up to focus on what matters most – making your merch stand out in a way that’s authentically you. It’s time to say goodbye to design limitations and hello to merch that reflects your unique brand and vision.
Overcome design hurdles with merchOne’s product customization features
If you’ve ever wanted greater control over your merch designs, our customization tool is the answer. From intuitive image editing to flexible layer management and streamlined workflows, these features empower you to create unique and on-brand products.
Whether you’re a seasoned designer or just starting out, you’ll find the tools you need to bring your creative vision to life.
1. Effortless design with flexible options
Get ready to elevate your product designs! This section introduces tools that give you total freedom of expression. Whether you’re starting with your own artwork or even harnessing the power of AI, everything you need to make eye-catching creations is right at your fingertips.
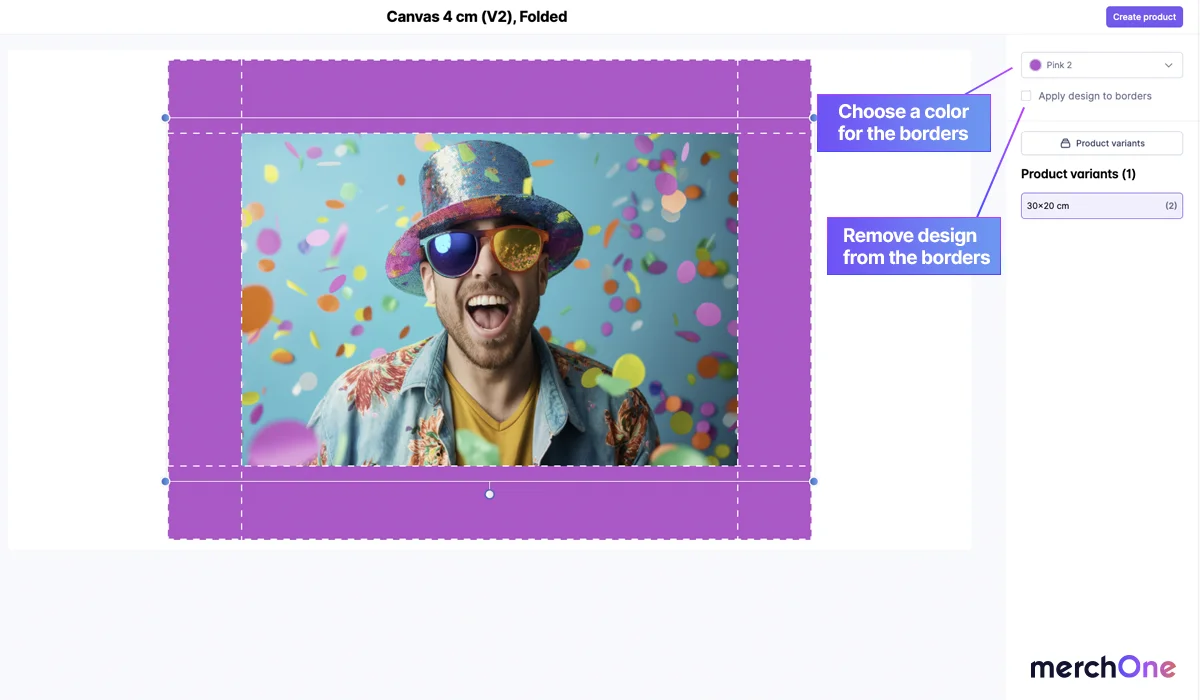
Border design (real-time preview)
Borders let you frame your merch designs, adding polish or emphasis. Real-time preview means you see the change instantly on your product, so there’s no guesswork!
Step-by-Step
- Choose the style of border that fits your design’s vibe:
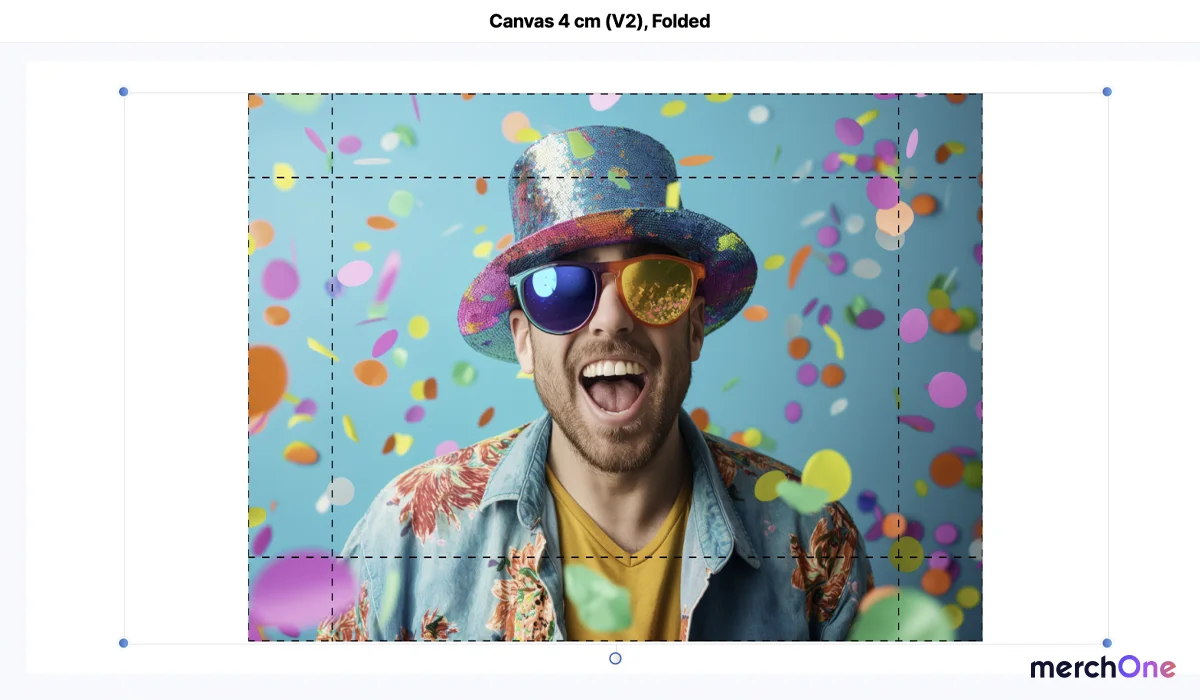
- “Folded”: Gives a neat, classic look, like a picture frame around your merch.
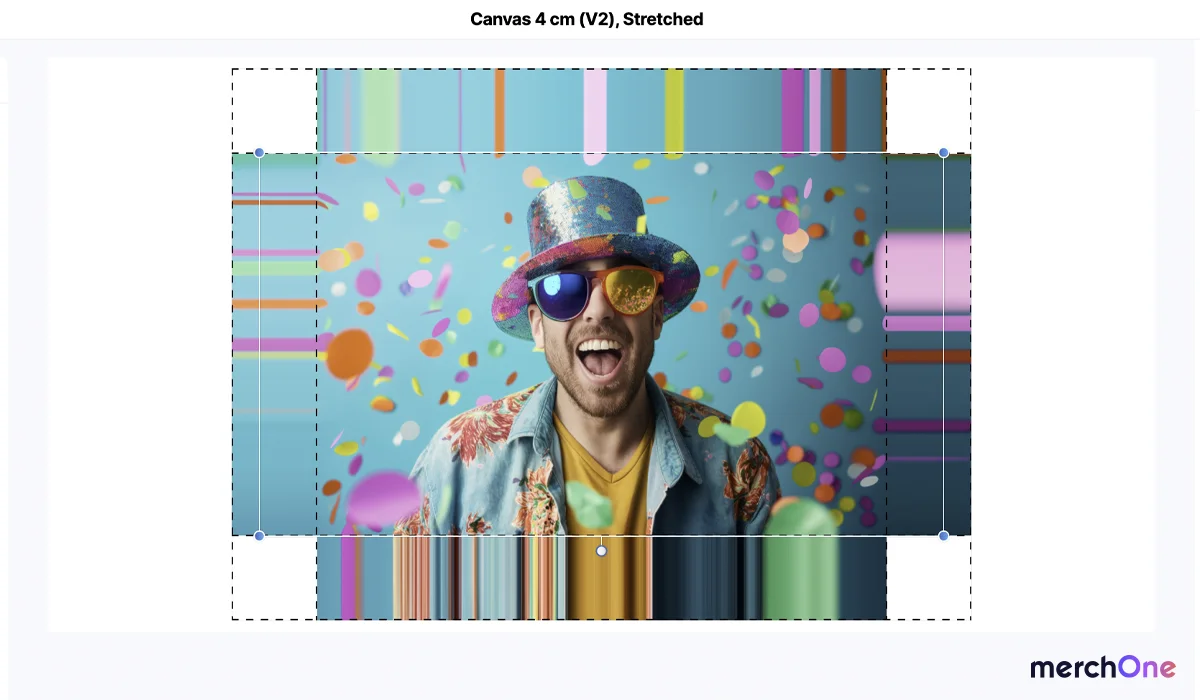
- “Stretched”: Makes your design spill over the edges for a bold, full-coverage effect.
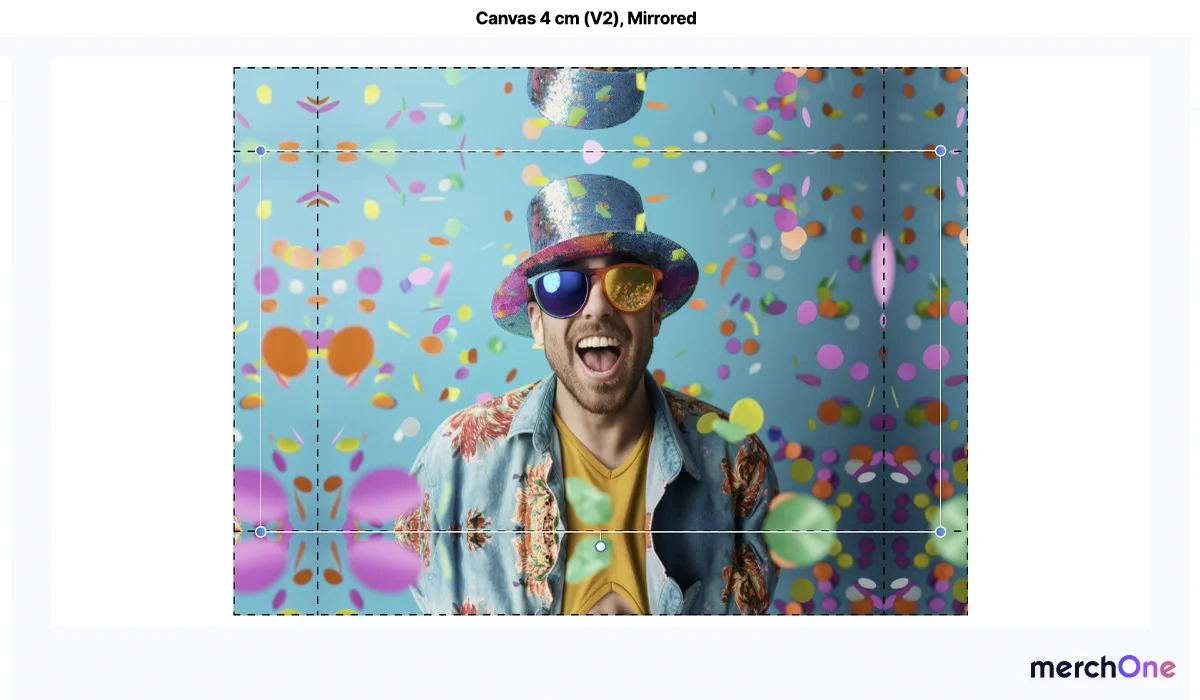
- “Mirrored”: Creates a cool, repeating pattern – perfect for abstract or geometric designs.
- Real-time preview: shows you how your border choice transforms the look of your product as you work. Play around with adding images and text – watch how they interact with your border for awesome effects!
- Extra option: Want a solid color border instead? Check off the “Apply design to borders” box and pick your color. Make it match your design, go super bright, or choose something subtle – you’re the boss.
Remember: Experimenting is the best way to discover what looks fantastic on your merch!

Key benefits
- Draws attention: A border guides the eye to your main design, creating focus.
- Professional touch: Instantly elevate the look of your merch, especially when used alongside good image alignment.
- No design skills needed: Borders offer impact without needing to be an artist. Experiment with what looks best!
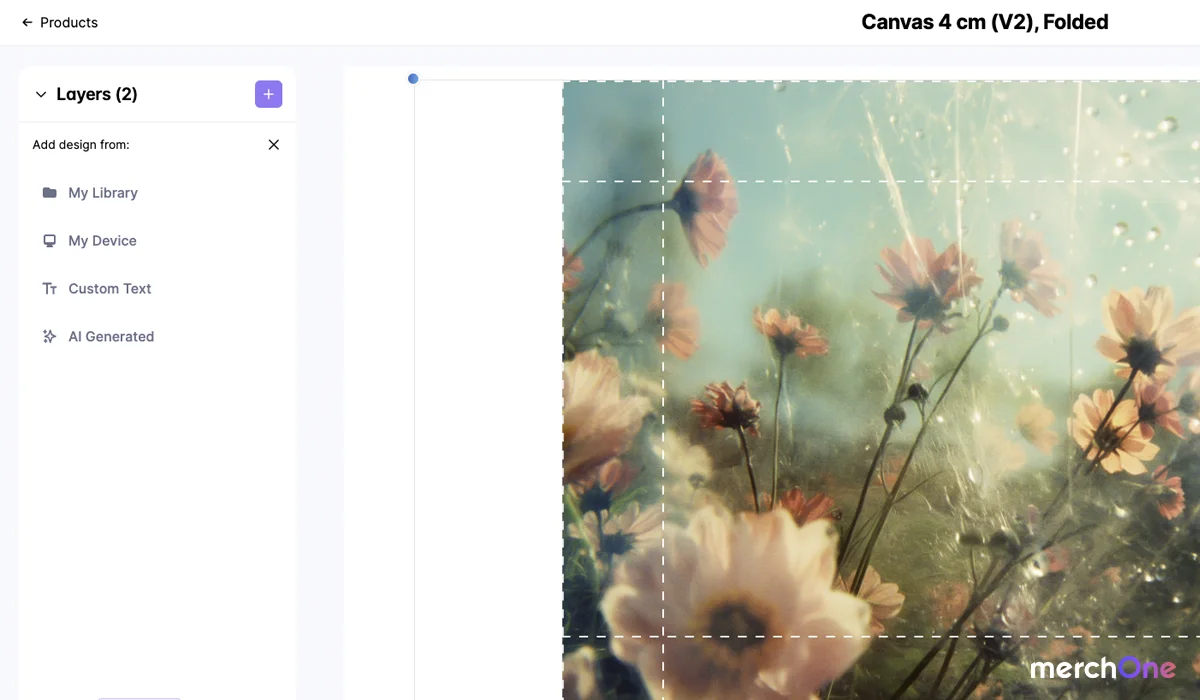
Four layer creation options
Building designs layer by layer is like stacking blocks – but way more fun! Get ready to unleash your creativity and make merch that seriously stands out. With easy tools for uploading your own art, easy access to previously used images, adding your own words, or letting our AI Product Configurator surprise you, the possibilities are endless. If you can dream it, you can design it!
You have 4 options when creating a new layer: “My Library”, “My Device”, “Custom Text”, “AI Generated”. Each option was developed with one purpose: to help you materialize your ideas into products.
- My Library
Think of your Image Library as a treasure chest of cool visuals you’ve used before. Every time you save a finished product, the images from that design get added automatically! Next time you’re creating, no need to re-upload old favorites – they’re waiting for you in the Library, ready to be used again in fresh and exciting ways.
Important note: Only saved projects add their images to the library – so make sure you hit that save button for easy access later!
- My Device
Have fantastic photos, sketches, or designs saved on your computer, phone, or tablet? The “My Device” option is your bridge to putting those creations onto awesome merch. Whether it’s a meme only you would think of, or a beautiful logo you commissioned, uploading it is a snap.
- Custom Text
Add personality with text that pops! Whether it’s a funny catchphrase, an inspirational quote, or just your brand name in an eye-catching font, “Custom Text” puts you in control.
Choose colors that stand out or blend in, play with bold sizes, and even add fancy styling. Your merch is about more than images – it’s about your message.
- AI Generated
Ever wish you could draw anything? Our AI Image Generator is like your magic art assistant! Describe what you want to see – a cat wearing a pirate hat, a watercolor landscape of Mars…the weirder the better!
With each prompt, you’ll get four unique variations. Discover designs you never could have come up with, and let your merch stand out with a touch of AI magic.
Tip: The more specific you get with your words, the more impressive the results will be!
2. Intuitive layer control
Think of your design like a stack of elements you can arrange perfectly. These tools provide precision and versatility. Rotate, flip, layer images with transparency, and ensure everything lines up flawlessly. Plus, with advanced image editing, refine your work’s look until it matches the masterpiece you’ve envisioned.
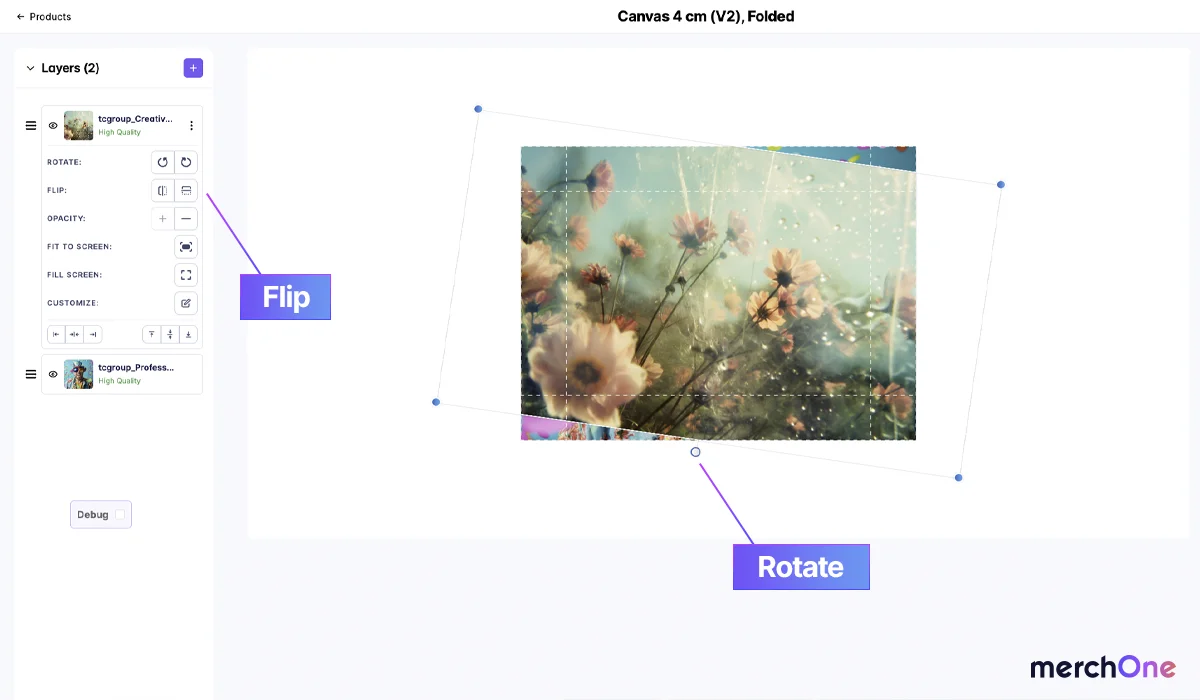
Rotate & Flip
“Rotate & Flip” puts you in charge of the appearance of your images. Whether you need to precisely match a product’s curve, create a pattern with flipped elements, or fix an accidental upside-down photo, these tools offer total precision.
Step-by-Step
- Rotation:
- Look for a gray circle on the bottom of your design.
- Clicking and drag to rotate your image freely in any direction.
- Bonus tip: pressing the “Shift” key while rotating your image, will snap to precise angle intervals.
- Flipping:
- “Flip Vertical”: Reverses the image top-to-bottom. (Logo upside-down? This fixes it!)
- “Flip Horizontal”: Mirrors the image across a center line, as seen in a reflection.
Key benefits
- Perfect placement: Make text fit a curved product edge or tilt a design element for a dynamic look.
- Creative effects: Flipping creates symmetry or lets you repurpose art facing the wrong way for your needs.
- Easy edits: No complex design skills are needed for basic adjustments that have a big impact.
Practical example
You’re designing a keychain with a photo of a pet. The photo’s a bit crooked – a quick rotation of a few degrees and it sits perfectly upright!
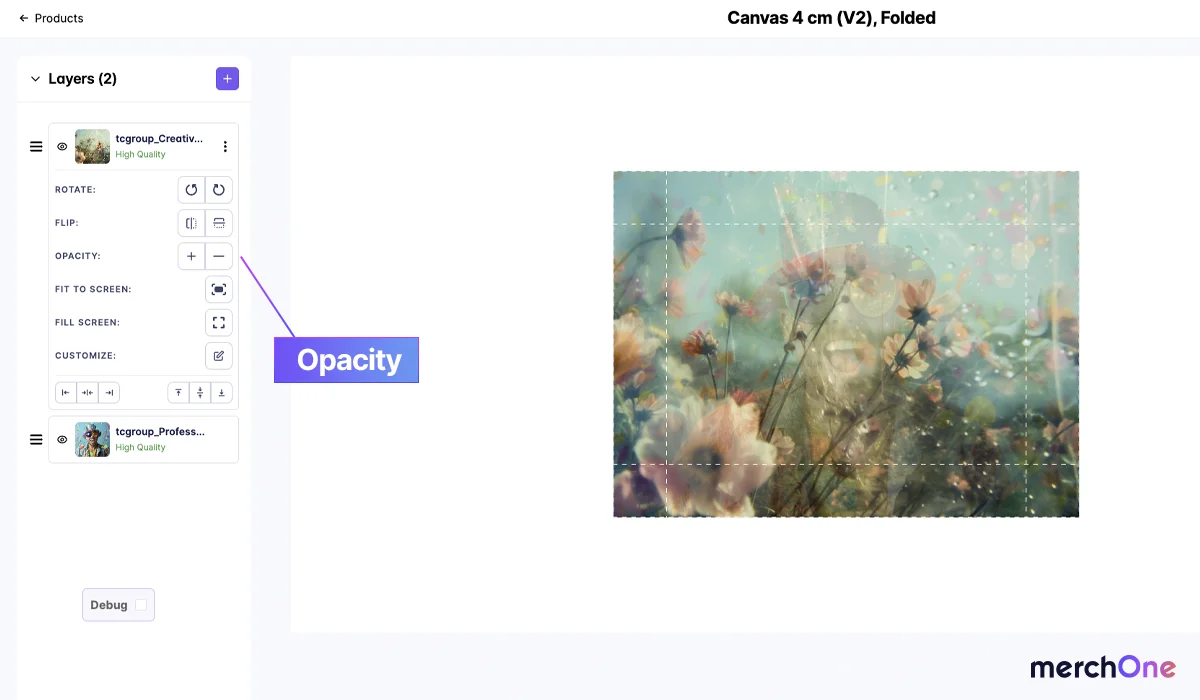
Opacity
Want to make a design element softer or bolder? “Opacity” is your answer! Think of it like turning the “volume” up or down on how much an image stands out. It’s a simple way to change how your merch looks significantly.
Step-by-Step
- Find the Opacity Settings: Positioned in the third row in your layer settings.
- Plus = Solid: Your starting point! Your design is completely opaque, covering anything below it.
- Minus = Less Visible: Try going down by increments by clicking on the “minus” button. Notice how your design blends with whatever’s beneath it on your product.
Key benefits
- Create depth: Layering images using opacity makes designs more interesting, revealing what’s “behind” the top layer peeks through.
- Softer look: A partially transparent harsh graphic creates a gentler feel, which is great for backgrounds.
- “Watermark” effect: Your subtle logo faded across a whole design protects your work on preview mocks.
Practical example
You’re making stickers with a fun quote. Layered underneath it, a bold pattern at half opacity adds visual interest without making the text hard to read.
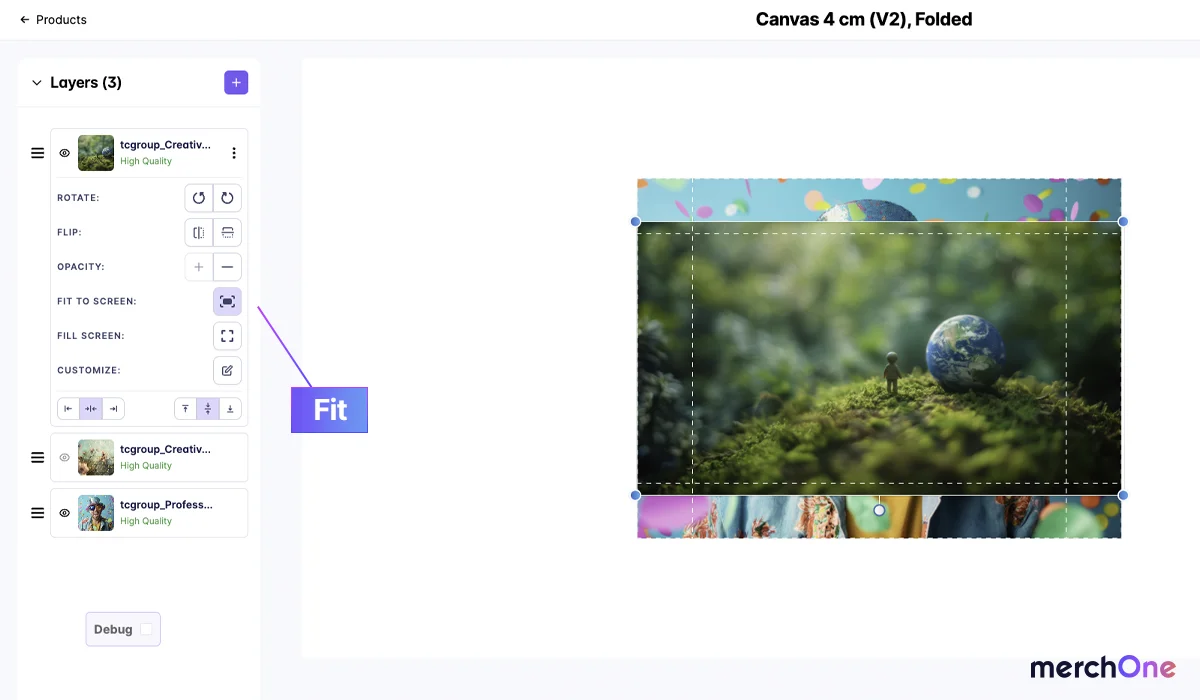
Fit/Fill controls
Ever had a fantastic image that just didn’t fit right on your product? “Fill/Fit Controls” make that a thing of the past! With a few clicks, you can stretch or resize any element to match the exact shape of what you’re making — no awkward gaps, no weird squishing — just perfectly placed designs.
Step-by-Step
- “Fit” option:
- Resize the image until its widest part (height or width) touches the edge of the printable area.
- Extra space might be left on one side, but you avoid blank gaps around your design.
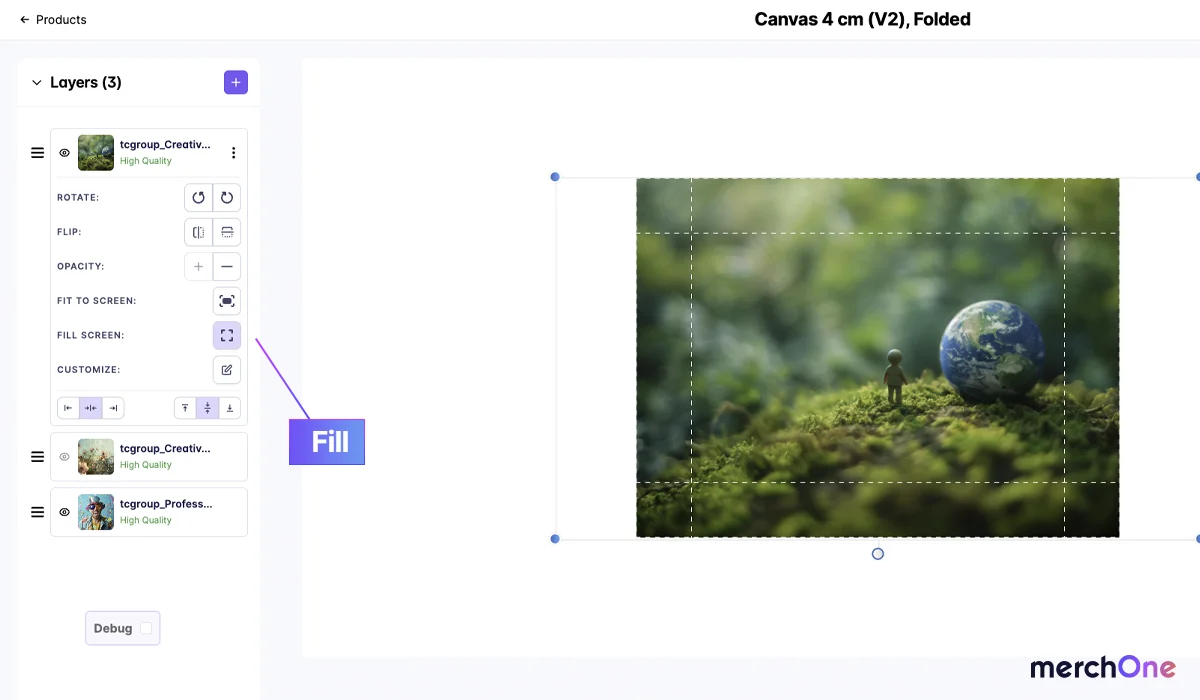
- “Fill” option:
- Enlarge the image until the entire printable area of your product is covered.
- If you have essential elements on the edge of your image, they might get cut off.
Key benefits
- Professional finish: No mismatched images on your merch! Customers expect their product to look like the advertised design.
- Eliminates guesswork: There is no need to fiddle with manual resizing that can end up wrong.
- Focus on creativity: Instead of stressing about technical fit, spend that time making gorgeous designs.
Practical example
You’re making a shirt with a panoramic landscape photo. “Fit” preserves the shape beautifully, leaving a white border on top and bottom for an artistic look. “Fill” might stretch the image unnaturally if it’s very wide.
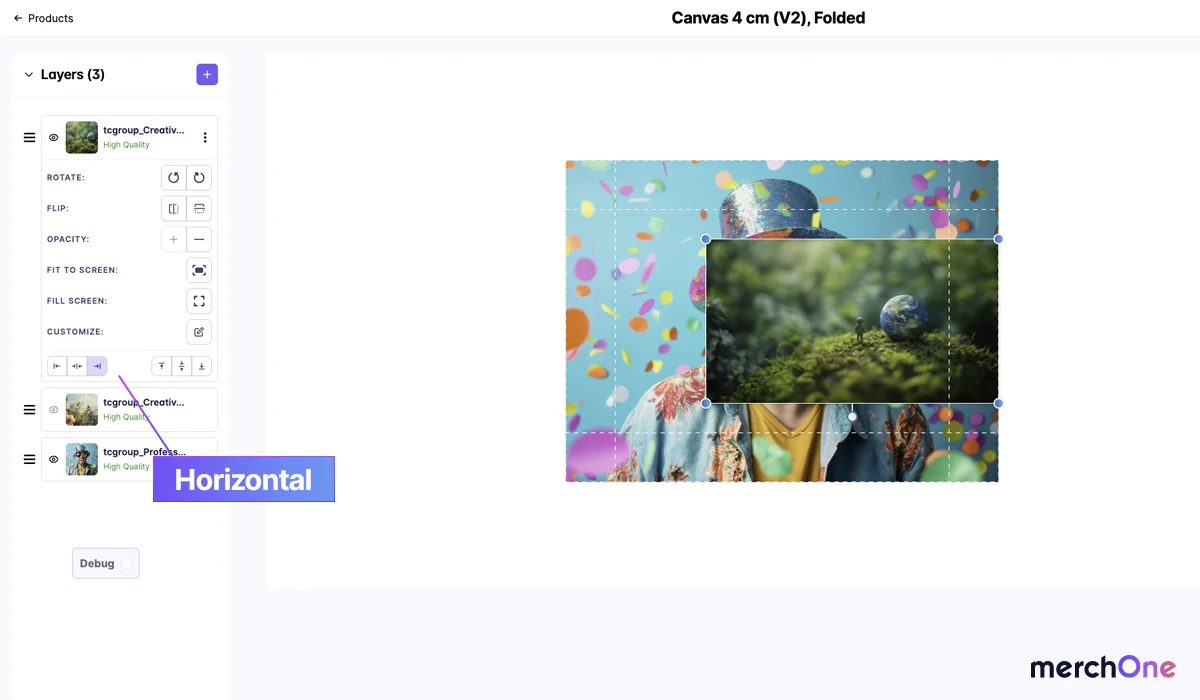
Alignment Tools
Alignment tools bring order to your design! Whether you’re centering a logo on a shirt, spacing out a pattern with precision, or ensuring text hugs the edge perfectly, these buttons take the frustration out of fussy placement. Think of it like having invisible guides for a balanced, organized masterpiece.
Step-by-Step
- X-Axis (Horizontal): These buttons control the left-to-right position.
- Center – Moves the image so its middle is in the dead center of your product.
- Left/right align – “Snaps” the image with its side perfectly touching the left or right edge of your print area.
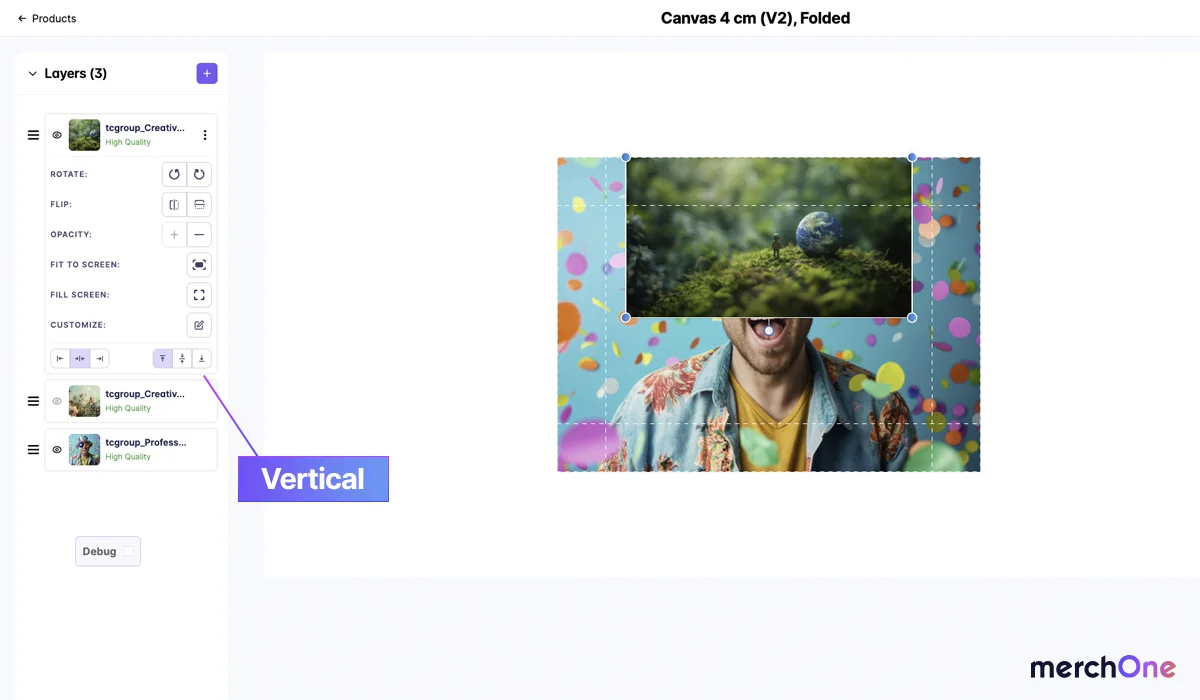
- Y-Axis (Vertical): Buttons for Top / Middle / Bottom alignment, controlling the up-and-down position.
Key benefits
- Instant symmetry: Perfectly balanced designs look professionally made, even if you don’t have a designer’s eye.
- Time-saver: Aligning everything by hand is finicky – one-click perfection makes your workflow more efficient.
- Multi-element harmony: Ensure multiple images, text blocks, etc., relate to each other in a visually pleasing way.
Practical example
Putting a business name centered under a logo on a tote bag? Alignment tools guarantee it looks crisp, without having to nudge it bit by bit painstakingly.
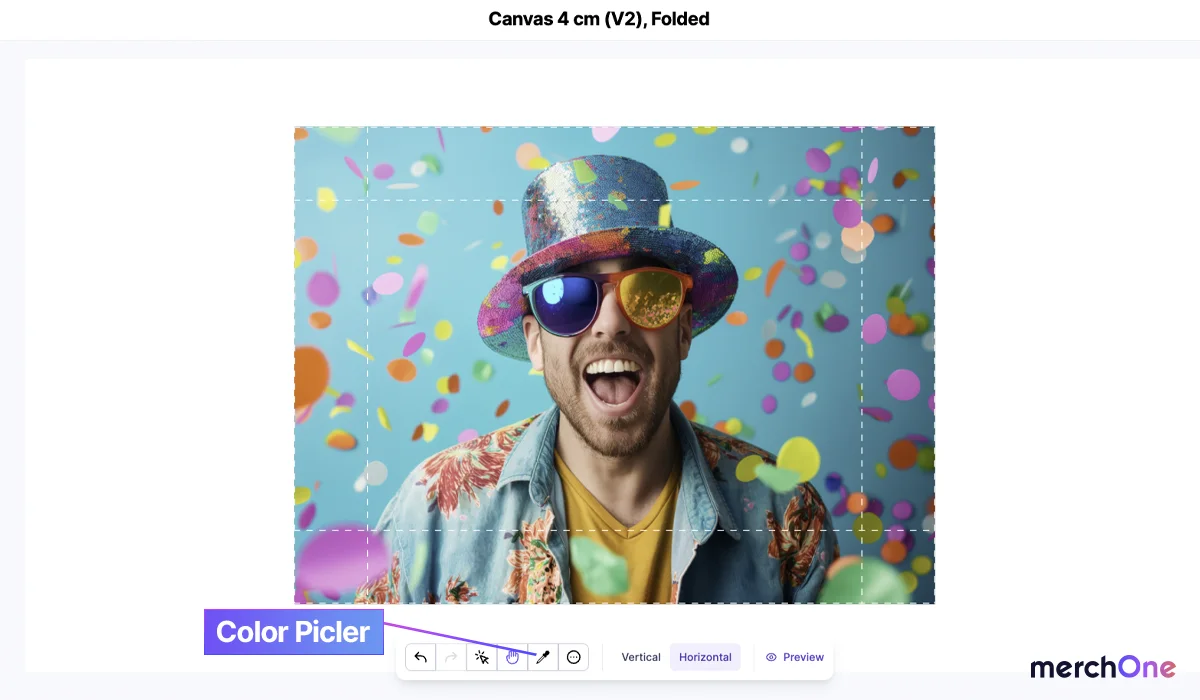
Color Picker (HREF sampling)
Found the perfect shade of blue on the mug itself? Our Color Picker lets you steal it for your design! Click any part of the product preview, and that color is yours to use with a single click. No more guessing games to achieve perfect color harmony.
Step-by-Step
- Find the eyedropper: The Color Picker looks like a little eyedropper icon positioned at the bottom toolbar.
- Activate & click: When the eyedropper is selected, use the magnifying glass icon to select precisely the color you want.
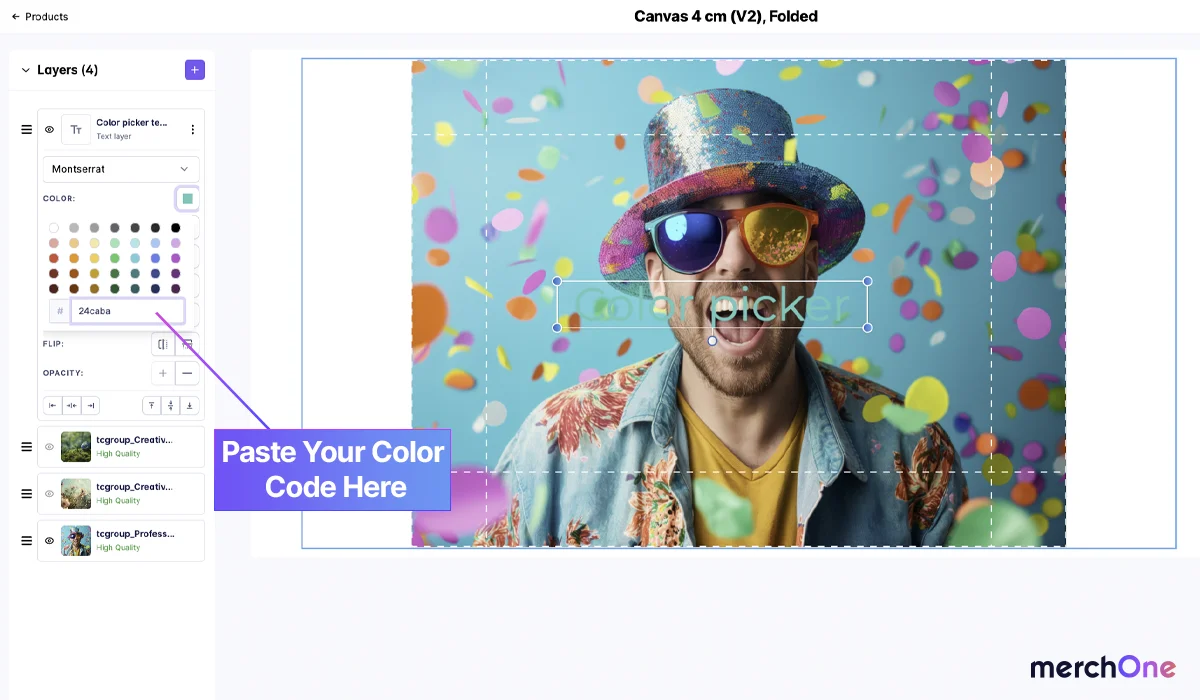
- Seeing the code: Your selected color HREF code (e.g. #FFC0CB) will be available in your clipboard to paste it into a document or note.
- Applying your picked color: You can apply your color to a text layer for example, making sure that all colors in your design are in harmony.
Key benefits
- Exact matches: No more “close enough” colors – pick a shade from the physical product for design harmony.
- Brand cohesion: If your company has specific colors, sampling builds consistency across merch and your website listings.
- Customer expectations: The color matching helps prevent disappointment when designs on-screen vs. on the product vary too much.
Practical example
Designing a shirt with a pink sign to promote a bakery? Sample that pink using the Color Picker – your text or graphics will now be identical to what draws people in from the street!
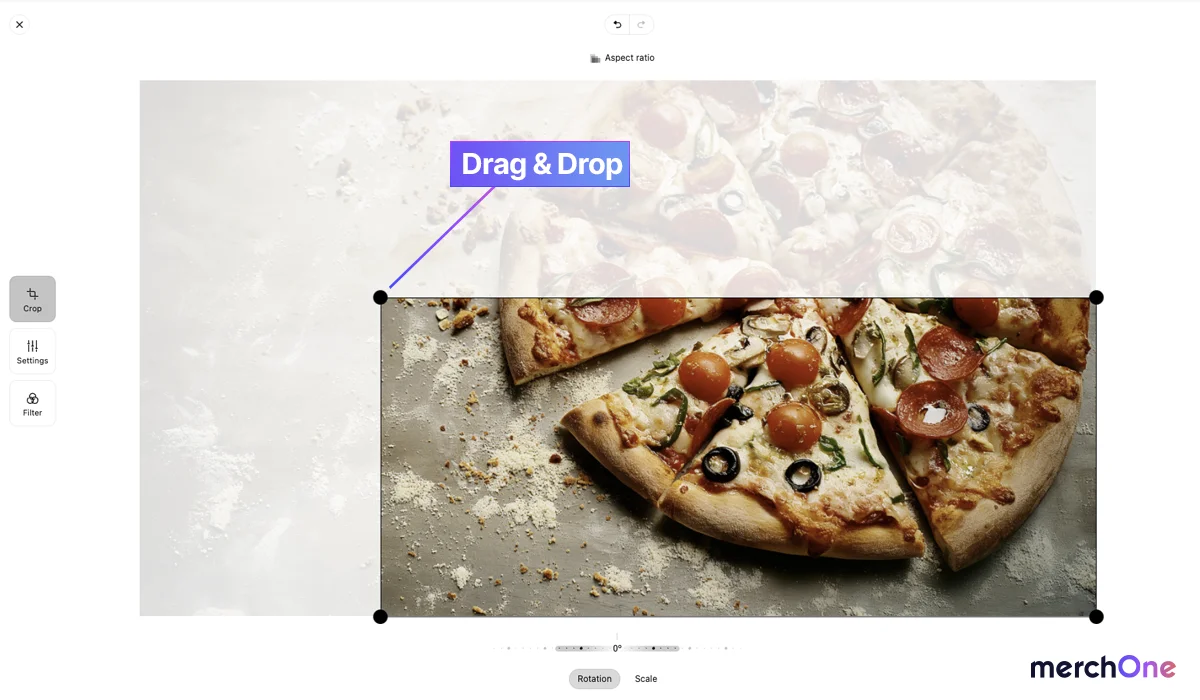
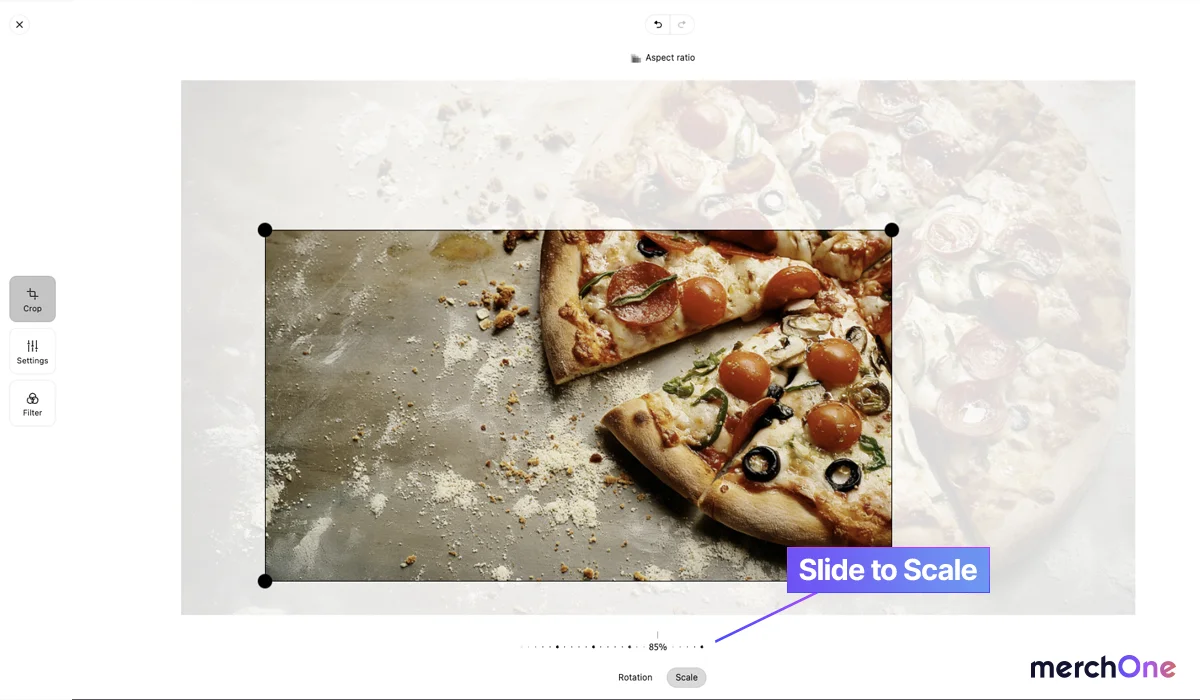
Crop tools
Crop Tools let you transform any image into something new. Turn a landscape into a perfect square for a product. Isolate a single design element to use as a sticker. The possibilities are endless once you start snipping!
Step-by-Step
- Find the crop tab: On the main toolbar on the right-hand side of the screen, you need to click on the “Customize” icon.
- Click & drag: For a straight-up cut, click & drag from one of the edges, where you can crop your design to any desired ratio.
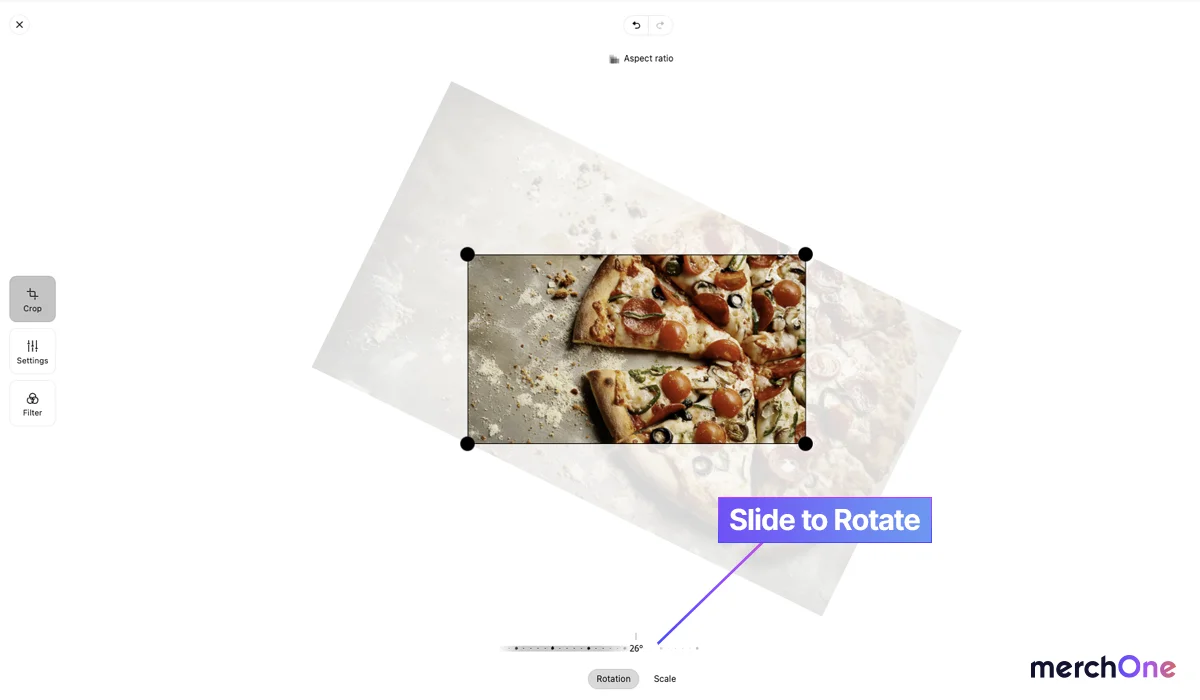
- Automatic options:
- Rotation – Using the degree slider below the image, you will rotate the image while zooming in on the center. This allows you to achieve different angles and perspectives.
- Scale – Using the degree slider below the image, you will zoom in on a specific point within the image, maintaining the same ratio.
- Aspect ratio: With a click of a button, you can select pre-defined ratios that can help improve your workflow creating visuals for different types of products.
- Confirm the crop: To finish the process and apply all changes, just click on the button “Save changes”.

Key benefits
- Composition fixer: Bad photo with lots of clutter? Crop down to the good part, and it instantly looks better.
- Creative angles: Cropping an image diagonally adds dynamic energy to your design.
- Product fit: Ensure your cropped image sits perfectly within tricky print areas (circles, etc.)
Practical example
Uploading a full-body selfie for a mug? Use a square crop to focus on the face – ideal for close-up placement and no weird gaps.
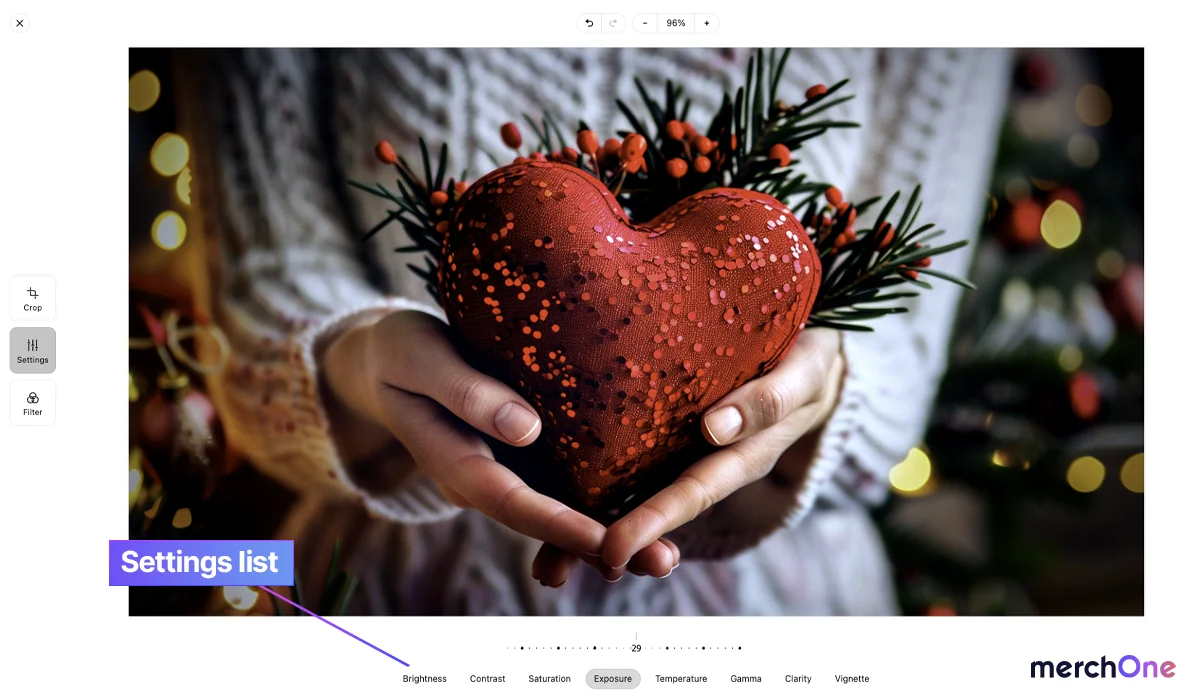
Image settings
Think of “Image settings” as your design superpower! Take any image from “okay” to “AMAZING” with simple adjustments. Make it brighter to stand out, bump up the contrast for extra drama, or give it a warm vintage glow. Perfect for perfecting those uploaded photos.
Step-by-Step
Each setting uses a slider to apply adjustments. Experimenting shows how they work best!
- Brightness: Makes the entire image lighter or darker overall. Perfect for when your uploaded photo needs basic adjustment.
- Contrast: The difference between the darkest and lightest parts. Increases “drama” with deeper blacks and bolder highlights. It makes your designs stand out on the product!
- Saturation: Intensity of colors – turn it up for vividness, down for a faded vintage feel. It helps your merch match your brand’s overall aesthetic.
- Exposure: Controls the overall lightness or darkness more subtly than brightness. It is great for fixing photos taken in weird lighting.
- Temperature: Shifts between warm tones (yellow/orange) or cool tones (blue/green). Can transform the entire mood of your design!
- Gamma: Affects the midtones of your image. Upping it makes those middle-brightness parts lighter, which can add a soft, faded look. Decreasing it adds depth and richness to those midtones.
- Clarity: Makes details crispier. A little goes a long way in making your designs look sharp on the finished product.
- Vignette: Darkens or lightens the edges of your image, drawing the eye inward. Use it for a creative effect or to guide the viewer’s focus subtly.
Key benefits:
- Photo fixes: Did an uploaded image turn out too dull? Boost brightness, play with contrast – sometimes it’s a lifesaver.
- Style control: Match your image’s mood to your product. Pastels go softer, a vintage graphic benefits from warmth…it’s like custom mood lighting.
- Problem-solving: Is the image too dark against a dark product background? Bump up the brightness so it stands out!
Practical example
Your sunset photo on a travel mug looks okay, but…boost those saturated reds/oranges, crank the warmth – and it now matches the actual experience you’re selling!
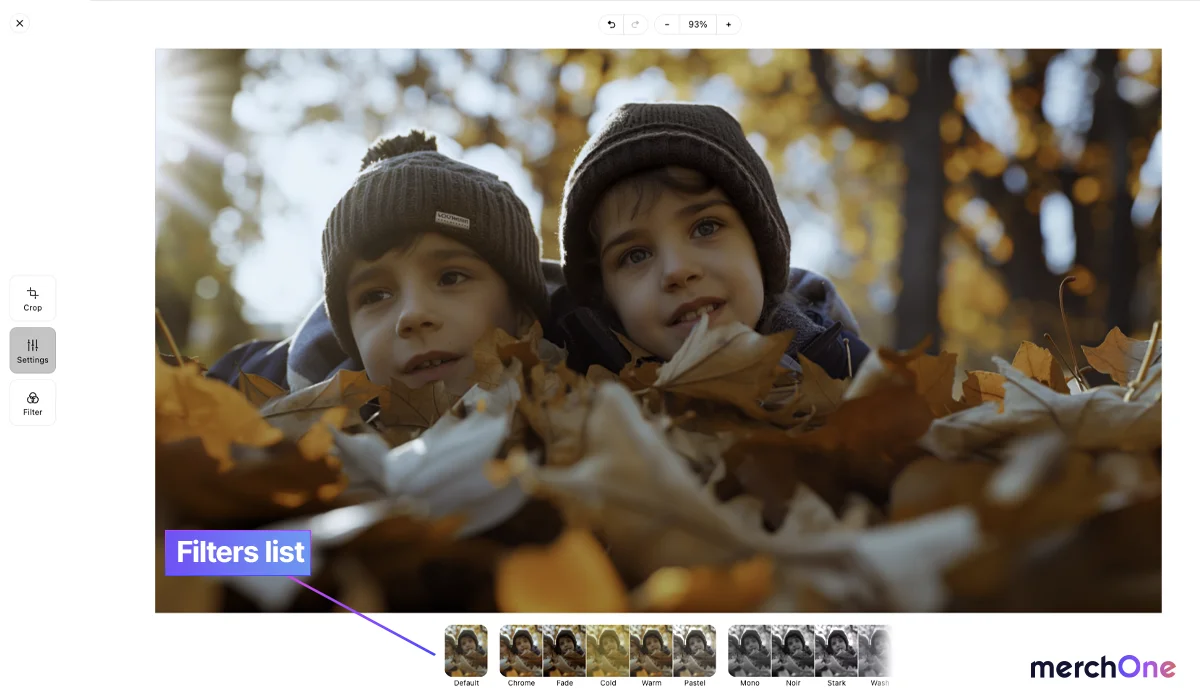
Stylized filters
Want your merch to look retro, modern, edgy, or dreamy? Filters are your shortcut! With just a click, you can completely change the mood of your design. No need to fiddle with individual settings – browse and find the perfect aesthetic.
Step-by-Step
- Find the filters: Our expanded list of pre-made filters is available right below your image.
- Preview power: Experiment with all filters at will to find the perfect match for your image. Filters are not overlapping, meaning you can try them all before settling for a final decision.
- Click to commit: Once you find a filter you love, a single click on the “Save Changes” button applies it to the image!
Key benefits
- Instant aesthetics: Turn something plain into retro, grunge, modern art… endless options to match your vibe.
- Trend tracking: Filters give you access to what’s popular in the design world with a few clicks.
- Time-saver: Skip fiddling with multiple individual settings – a filter gives you a whole look that blends well together.
Practical example
Selling a shirt with a hand-drawn illustration? Try a “Noir” filter that makes it look even more like it came from an artist’s notebook!
3. Streamlined productivity
Your time is precious! Here, we dive into ways merchOne’s customization tool optimizes your workflow. Whether dealing with product variations, applying changes effortlessly across items, or simply rearranging design elements to find what works best, these features eliminate tedious tasks and keep you in your creative flow.
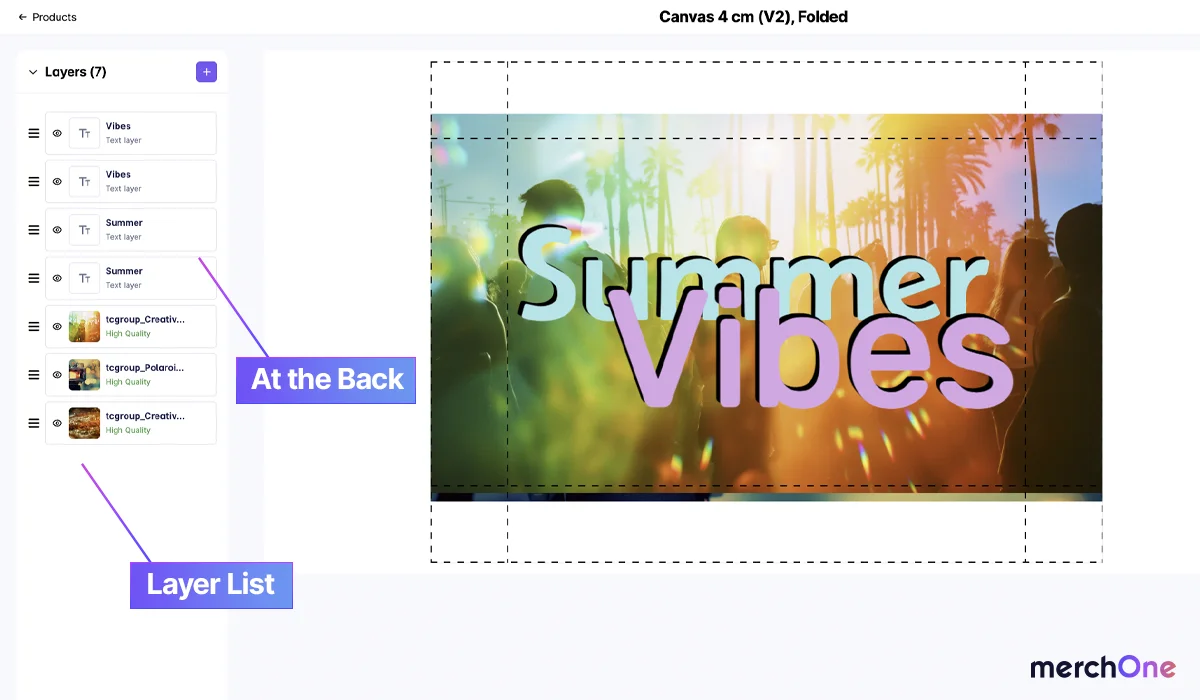
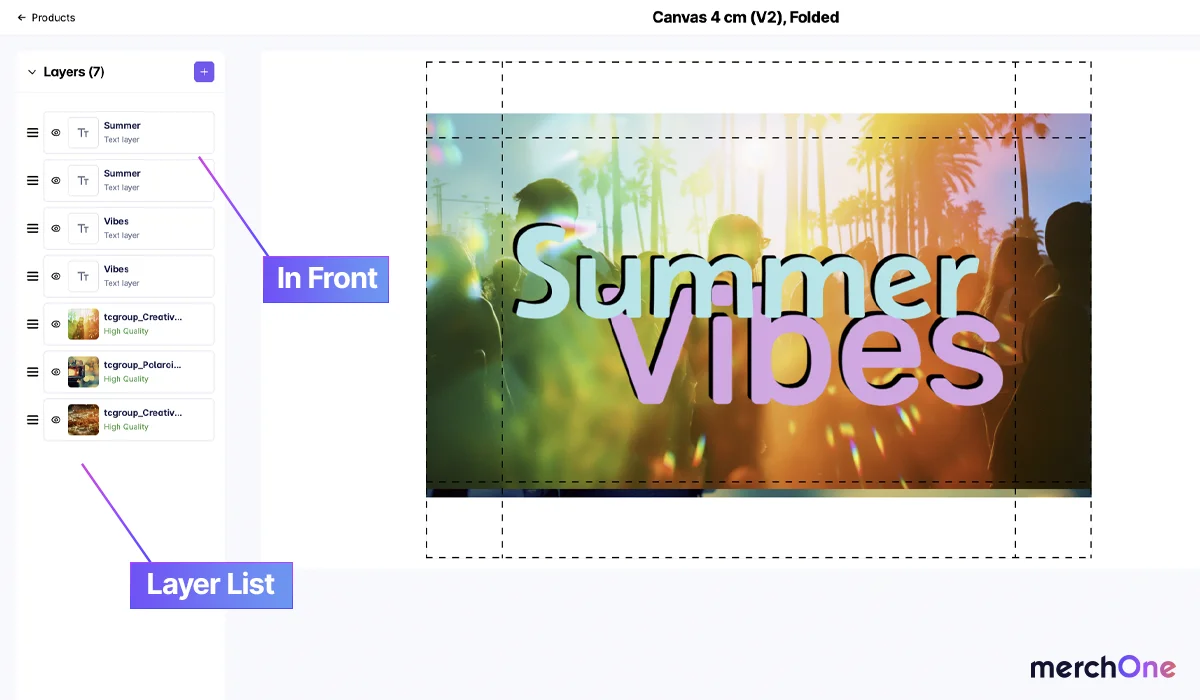
Drag-and-drop layers
Ever messed up your design with no way back? “Drag-and-Drop Layers” takes the pressure off! If you change your mind about the arrangement, re-shuffle things around. It’s the perfect way to explore different ideas without fearing making permanent mistakes.
Step-by-Step
- Find your layers: Your design layers are organized in the left-hand side toolbar.
- Click & drag: Simply click on the layer you want to move, hold your mouse down, and drag it up or down in the list. Watch the change happen on your design in real-time!
- Front & back: Top of the list = in front of everything else. Bottom of the list = hidden behind everything.
Key benefits
- Experiment fearlessly: It’s easy to “un-do” an arrangement you don’t like. This encourages playfulness and trying out ideas.
- See what works: Instantly check if the text looks better over or behind it. No guesswork or time wasted re-doing things.
- Complex compositions: When you have several design elements, layering control ensures that nothing you want to see gets accidentally hidden.
Practical example
Designing a poster with a photo, a quote, and an accent graphic? Being able to drag each element on top quickly helps you find which arrangement is most eye-catching!
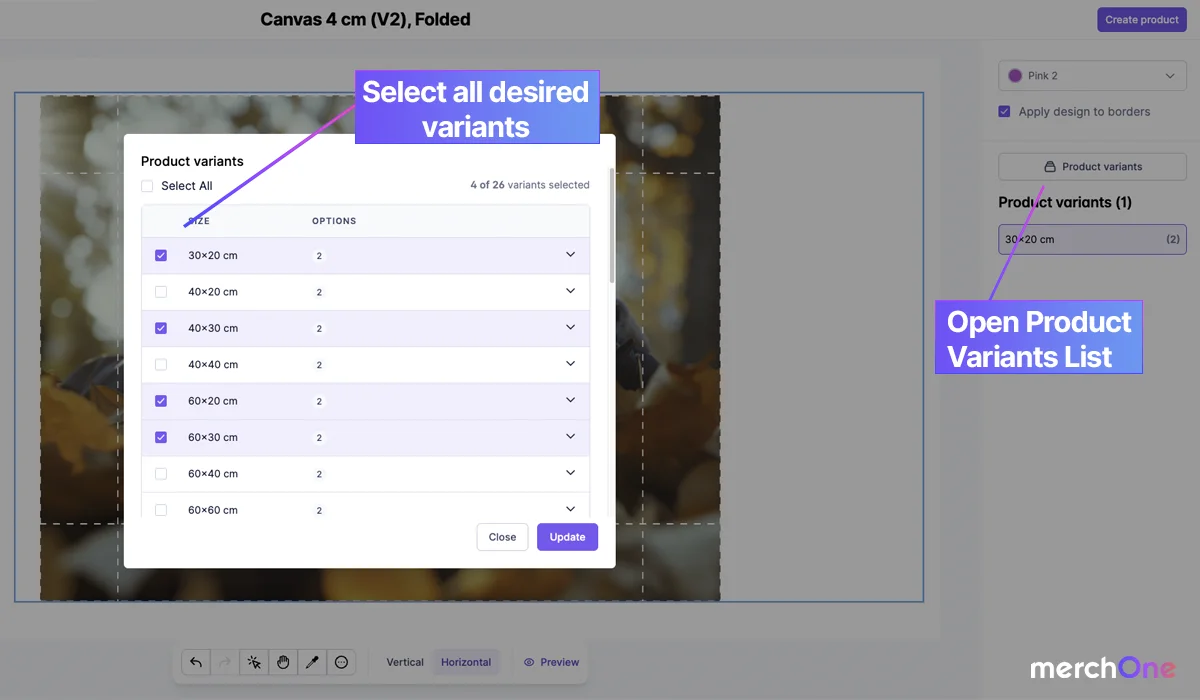
Multi-variant control
Do you offer your designs on different sizes of the same product? “Multi-Variant Control” keeps things seamless! Adjust placement for a flawless fit on everything from the smallest to the largest canvas, or tweak colors to suit each size variation perfectly.
Step-by-Step
- Select your variants: Tick boxes next to the desired variant to select it.
- Editable Properties: Usually limited to EASILY changed stuff:
- Design Placement: Moving your graphic up/down in unison across multiple products.
- Image Filters: Maybe you can apply “B&W” across a collection, but NOT complex color edits.
- Committing the Bulk Edit: An “Apply” button or similar finalizes the change, affecting every selected variant at once.
Key benefits
- Time-saver: Make a change once, it updates multiple variants – this is huge if you have many variants.
- Consistency: Ensure your design placement/sizing looks great on every variant in one go.
- Experimentation: Quickly see how different angles you might not have considered at first look across other size variants.
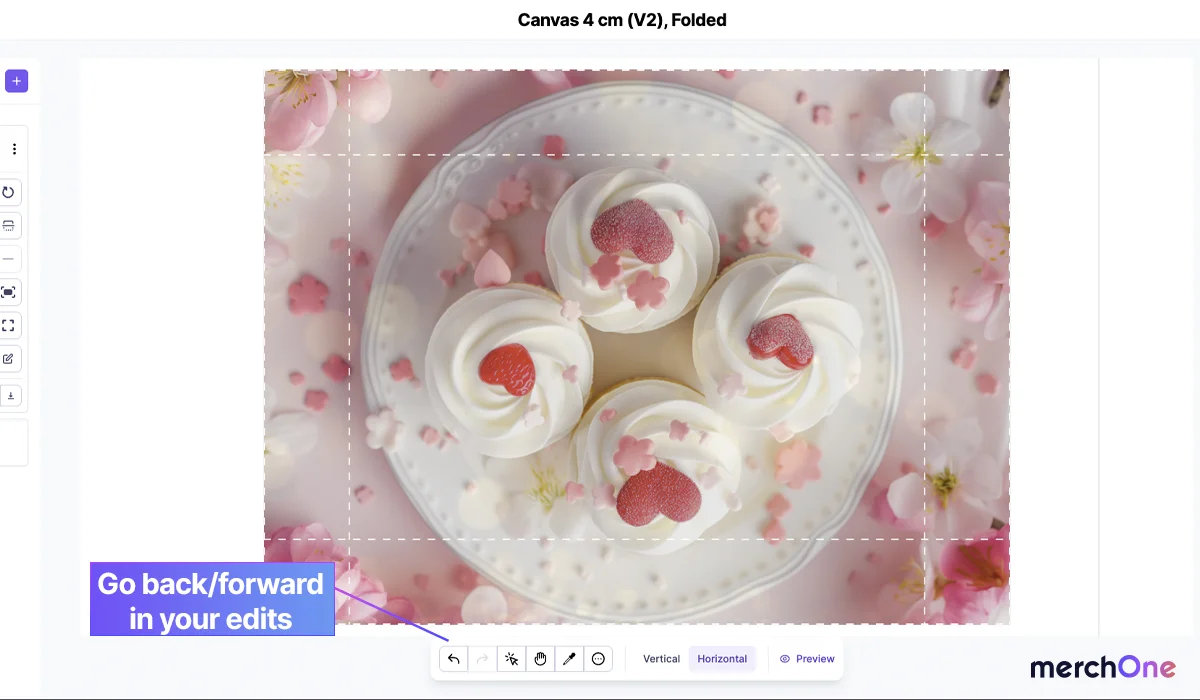
History management
Ever wish you could go back in time with your design? History Management is the next best thing! Easily undo steps, jump forward again (“redo”), and see your work transform. It’s perfect for trying things out without fear.
Step-by-Step
- Finding history controls: You will find this feature in the toolbar just below your image.
- Going back in time: Click the back arrow to reverse your image to the previous step.
- Branching paths: You can “redo” steps by clicking on the front-facing arrow as you experiment. It’s not just linear!
Key benefits
- Confidence to create: “Messing up” is less scary when you can go back, leading to greater experimentation.
- “What If?” power: Easily compare several past versions to see which is strongest.
- Happy Accidents: Recovering something from your past work you thought was lost forever fuels further ideas!
Practical example
Spent ages getting a filter combo just right but then made another change that ruined it? History lets you jump back to before that bad edit, keeping your filter magic.
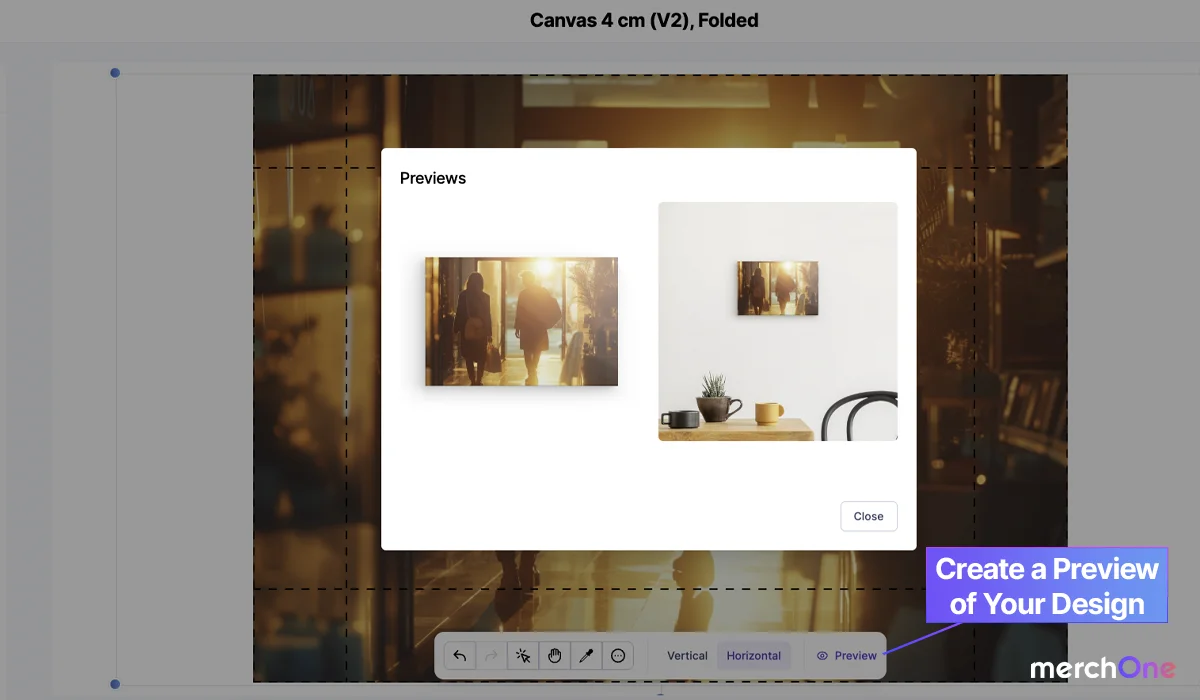
Product Preview
Product Previews are like a crystal ball for your merch! See exactly how your design translates to the finished product. No more guesswork – get that “wow” feeling when it goes from your screen to a real-world object.
Step-by-Step
- Previews while designing: Ideally, real-time updates show your design on the 3D product whenever you want to check on your progress.
- Isolated view: This means the product alone, usually on a simple backdrop. Great for checking detail accuracy.
- Lifestyle view: The product in context – your mug on a desk, a T-shirt being worn, canvas on the wall…this helps envision its appeal.
Key benefits
- Customer simulation: You become the buyer – does the preview spark that “I need to have this!” feeling?
- Spotting errors: Is a small text element readable on the real product? Previews prevent costly, disappointing orders.
- Selling power: Realistic previews for your marketing materials elevate your listings beyond those with only simple designs on flat blanks.
Practical example
Designing a mug with complex patterns? Isolated preview checks that it all lines up perfectly. Lifestyle previews showcase it on a table, subtly conveying that you’re selling trendy items!
From inspiration to storefront: merchOne’s customization powers your success
With merchOne’s intuitive customization tools, your creativity has no limits. Whether starting your side hustle or expanding your established brand, these features transform ideas into beautiful products your customers will love. You don’t need to be a professional designer – these tools offer easy ways to make designs with a polished finish, from playful to trendy.
But customization is more than just making stuff look nice. Previews help you understand the final product, ensuring it lives up to your vision AND delights the buyer. Time-saving features keep you organized while fostering experimentation. The result? Bringing your designs to market becomes swift and enjoyable; that energy shines through in the items you sell.
Ready to start creating? Dive into merchOne’s customization suite, embrace the playful features we’ve explored, and see where your imagination takes you! Success isn’t about artistic magic – it’s about harnessing the right tools to make your unique voice tangible.

